Feb 12, 2013

Yom Kippur - Egyptian Turn I (Part 2)

Combat Phase

Very successful barrages at 15.17 and the Chinese Farm left the Egyptian forces without their planned targets on those areas which is good since no combat takes place but it is also somehow bad since no Advance After Combat is possible.

Fig 1 - Empty Target Hexes After Barrage
The first real combat happened at 29.24 where 134th and 135th Infantry Brigades assaulted the Purkan Bar Lev fort with split results (6 @ 3:1 = A1 Dr1 which becomes A1 D1 since forts can't retreat).

Fig 2 - Combat @ 29.24
Next we moved into the key assault of the Egyptian turn: 4th, 16th,112th and 120th Infantry Brigades along with 150th and160th Commando Brigades attacked the Nozel Bar Lev fort at 32.23 destroying it (8 @ 9:1 = D3r2).

Fig 3 - Combat @ 32.23
The Egyptian forces did not advance into 32.23 to avoid possible stacking bottlenecks during the Exploitation Phase because as many armor and mech units should then cross the Canal at that point.

Supply Phase

Since most Egyptian units where on the West side of the Canal or adjacent to it there were no supply issues; the only exception where the two Airmobile Brigades at 33.23 and the two Commando Brigades @ 25.22.

Bridging Phase

The Engineering units at 15.18, 32.24 and 34.24 flip to their bridge side; 3-9 Engineering Battalion keeps its combat formation.

Exploitation Phase

Now is the time for Egyptian heavy units to roar across the newly laid bridges and secure the crossing points.

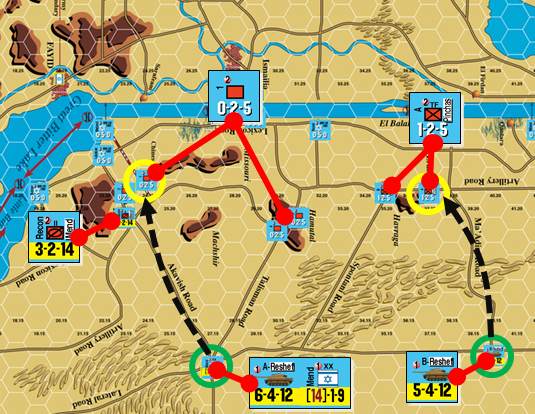
On the South the situation requires some caution; most terrain is clear and there are plenty of attacking avenues available for the IDF forces so Egypt went for a defense line close to the bridgehead.

Fig 4 - Exploitation on the South Front
The two Amphibious Battalions were sent to hold the only rough terrain near the crossing point to avoid the enemy building a strong position there.

Fig 5 - Exploitation by Amphibious Battalions
On the North front the previous destruction of the Chinese Farm defenders during the Barrage Phase allowed Egypt units to secure the Israeli VP Hex; it is important to notice that these moves were only possible because the Bar Lev forts and the Static Unit adjacent to the Chinese Farm don't project any Zone of Control; otherwise the +2 MP penalty would have prevented the Egypt units from reaching the Farm.
Fig 6 - Capture of the Chinese Farm
Finally the rest of the North units capable of exploitation were sent to pin enemy forces in their current positions on rough terrain close to the crossing points.
Fig 7 - Exploitation on the North Front
Tank Step Replacement Phase

There were no Armor casualties this turn so no need to use any of the available Tank Replacement Steps.

Clean Up Phase

After the initial moves Egypt has achieved most of what it was expecting; the bridgeheads seem to be solid and it has denied Israel one of its previously earning VPs by capturing the Chinese Farm.

At this point the game is a Draw with Israel having +1 VP due to control of Zrakor and Egypt +1 VP due to Supplied Armor/Mech Unit East of Canal (+ 1 - 1 = 0 = Draw)

Feb 4, 2013

Yom Kippur - Egyptian Turn I (Part 1)


Movement Phase

During this first turn Egyptian movement is basically restricted to Infantry crossing the Canal and Airmobile movement since the bridges are not laid yet and Mech and Armor units can not cross to the other side without them.

Fig 1 - Initial Infantry Crossings
In order to clean up the selected crossing sites Egypt moves Infantry adjacent to 15.17 - 2 brigades - and 32.23 - 4 brigades. Two other crossing at 30.23 and 13.17 are intended to ease establishing eventual supply lines.

Fig 2 - Airmobile Movement
Then Egypt took advantage of its - somehow limited - airmobile capability and transported two brigades close to the Chinese Farm and two Brigades close to 32.23; this last location became critical since the Bar Lev fort there suffered no damage during the Pre-Game Barrage and it blocks the planned crossing point.

The Movement Phase ended with the Egyptian amphibious battalions crossing the Canal close to the Bar Lev fort at 15.17.
Fig 3 - Amphibious Movement
Barrage Phase

Artillery kept softening the Bar Lev forts around the crossing points but it also attacked - support by Air units - the Chinese Farm in preparation for an early advance during the Exploitation Phase.

Fig 4 - South Barrage
The fort at 15.17 - already damaged by the Pre-Game Barrage - got destroyed (10 @ 18 = 1) leaving the South crossing clear of enemy units.

Fig 5 - North Barrages
On the North Egypt got mixed results: the combined barrage of 4 arty brigades only manage to DG 32.23 (4 @ 24) which was disappointing since that particular place was the main crossing point; another barrage at 29.24 got a DG result (5 @ 18) but since the target was already DGed nothing was gained; and finally the truly unexpected... 4 Air Units plus Frog battery completely obliterated the Israeli Static unit defending the Chinese Farm (10 @ 24 = 2)

Even if highly successful this last barrage left a couple of teachings: on one hand Egypt used its four available Air units (20 strength) plus the 12 strength Frog battery for a grand total of 32 but the maximum barrage column is 24 so at least one Air unit could have been used elsewhere; on the other hand the two Commando brigades transported close to the Chinese Farm early during the Movement Phase played a key role by avoiding the 2 column shift penalty for barraging targets with no spotter... without them the result would have been 1 (10 @ 13-17) instead of 2.


Jan 25, 2013

Yom Kippur - Pre-Turn I


Egyptian Pre-Game Barrage Phase

Prior to the first game turn the Egyptian player can use his artillery to soften Israeli targets; since Egypt main goal was to establish a crossing over the Canal it decided to focus on the few Bar Lev forts standing in its way.

Fig 1 - Egyptian Pre-Game Barrage
Barrage results were quite disappointing since the Nozel Bar Lev fort at 32.23 - the one blocking our main force path of attack - came out unharmed (Die roll of 2 @ 24 column on Barrage Table).

Despite the Nozel Bar Lev drawback the Purkan fort at 29.24 got Disorganized (7 @ 24) which should help when opening a supply line for later attacks on the Chinese Farm and the Lituf fort at 15.17 lost 1 step and became Disorganized (10 @ 18).

Air Unit Reset and SAM Suppression Allocation

Egypt got 3Air Points (AP) while Israel got 2; Israel allocated 1 AP for SAM suppression allowing the remaining 1 AP to fly missions within Egyptian SAM range (6 @ 1)


Jan 22, 2013

Yom Kippur - Egyptian Set Up


The Egyptian plan is quite simple at start: Cross the Canal in force, secure the Israeli VP hexes at the Chinese Farm and Zrakor then wait until the Exploitation Reserve is released before pushing down South.

The initial rush across the Canal is mostly restricted to infantry units since armor and mech require a bridge to reach the West shore and bridges are laid after the Movement and Combat phases; that leaves armor and mech with only the Exploitation phase of the first turn to move across the obstacle.

Another important - and more general - consideration is Egyptian HQ restriction to stay on the East side of the Canal; this could have a significant impact on supply mainly when trying to reach the farthest VP hexes like 23.01 or 50.01


The main attack will take place around 32.23 with the primary goal of securing an assembly area West of the Canal and then seize the Chinese Farm and Zrakor; the Nozel Bar Lev (32.23) must be destroyed at all costs to enable the crossing while the Purkan Bar Lev (29.24) should be seized in order to ease the supply of forces going after the Chinese Farm.

Fig 1 - North Set Up
On the South front we have a smaller force basically meant to establish a secondary crossing point and to harass the IDF forces coming through the Gidi and Mitla Passes.

Fig 2 - South Set Up
Next figure shows the Egyptian SAM coverage with is pretty good but not so effective due to Israel SAM Suppression rules that allow some Air points to operate within it.
Fig 3 - Egyptian SAM Coverage
Finally a few dispersed units have been located around Israeli VP hexes across the Canal like Suez, Fayid and Port Said but truth is if Egypt is ever forced to defend such places then it has to be already a quite desperate situation.


Jan 14, 2013

Yom Kippur - Israeli Set Up


The historical scenario seems to be heavily biased toward an Israeli victory; not only the Israeli player starts on a winning situation (+2 VP) but the initial Egyptian superiority of forces will be gone by Turn 3 due to arrival of Israeli reinforcements and his unavoidable achievement of air superiority.

I would say that just focusing on holding the Chinese Farm and Zrakor - the two Israeli VP hexes on the east side of the Canal - should be enough to obtain Victory - or at least pull out a Draw if things turn really bad - by carrying out opportunistic attacks on other locations.

Crossing the Suez Canal will release the Egyptian GHQ and also the Exploitation Reserve if this last force is still on hold so it should be delayed until the very end when the additional VPs due to the crossing itself or the control of additional VP hexes could make a difference.

Of course if the Egyptian Exploitation Reserve is released before the Israeli crossing of the Canal the ground forces will be more balanced but balance has never been good for attackers.


Let's look at the Israeli setup; it's first line of defense is composed by the Bar Lev fortifications along the Suez Canal (see Fig 1) whose location is pre-defined in the scenario. The problem with those units is their lack of ZoC which reduces them to a minor nuisance for the Egyptian player; he can safely engage a minimum number of Bar Lev forts to secure crossings and then ignore the rest.

Fig 1 - Bar Lev Fortification Line
Just behind the Bar Lev line lays the area where I expect the most critical fighting to take place: the Chinese Farm and Zrakor.

The Chinese Farm is defended by a Static unit; another Static and Mend Recon Bn are close to provide support if needed but the plan is to reinforce the place with Reshef Arm Bde (A) currently at Tasa.

A similar situation happens around Zrakor which is hold by Pinchas Inf Bde (A); supported by Pinchas Inf Bde (B) and with Reshef Arm Bde (B) expected to arrive as soon as possible from hex 40.14.

Additionally a couple of Static units has been deployed on Hamutal Hill to prevent easy movement and supply of Egyptian forces during initial turns.

Fig 2 - The Chinese Farm and Zrakor
On the northern section of the map (see Fig 3) the Alush Inf Bde should be enough to hold Churchill - an Egyptian VP hex - during the initial phase while the Amir Arm Bde will reinforce Zrakor and the crossroad left empty by Reshef Amd Bde (B)

Fig 3 - The Northern Area
 Finally on the South (see Fig 4) I will move most of my forces toward Lateral Road mainly to block or delay an improbable Egyptian raid toward the eastern VP hexes; what I decide to do with the arty units will depend on how the situation develops during the initial move.

Fig 4 - The Southern Area
A point worth noticing before we finish the IDF setup is the location of the SAM unit (see Fig 5) which I set up the the furthest to the North as possible - within 5 hexes from 22.04 - but even there not the Chinese Farm nor Zrakor are under its range leaving the Egyptian Air units free to operate over them.

Fig 5 - IDF SAM Coverage
OK, it's been a large post but it's finally over! Next time Egyptian Set Up

Jan 9, 2013

Yom Kippur - Victory Conditions


At the end of the game each side scores Victory Points (VP) - mainly due to control of designated hexes - and the outcome is calculated subtracting the Egyptian VP Total from the Israeli VP Total according to the following table:


+5 or MoreIsraeli Major Victory
+2 to +4Israeli Minor Victory
-1 to +1Draw
-2 to -4Egyptian Minor Victory
-5 or LessEgyptian Major Victory


There is also +1 VP awarded to any side having one or more Supplied mechanized units on the enemy side of the Suez Canal and players may decide to ignore a Cease Fire roll at the cost of -2 VPs.

The following image shows the location of VP hexes on the map and who controls them at the beginning of the game: the red circles show Israeli VP hexes controlled by Egypt; the green circles show Egyptian VP hexes controlled by Israel; and yellow circles show Israeli VP hexes controlled by Israel, namely The Chinese Farm and Zrakor.

Fig 1 - Location of VP Hexes
It should be clear that Israel begins the game with a +2 VP advantage (Israeli Minor Victory) forcing the Egyptian player to attack. Just moving a supplied mechanized unit across the Canal (+1 VP) would mean a Draw for the Egyptian player but if he wants to win the game he has to seize the Israeli VP hexes at the East side (yellow circles) as well as one or two of its own VP hexes.

The Israeli player could limit himself to push all mechanized Egyptian units to their own territory and keep control of The Chinese Farm and Zarkor to obtain Victory.